
Setting Up Saltbox API Gateway
Saltbox API Gateway supports the creation of customized API’s which integrate into any number of systems, securely and reliably.
Workflows define the behavior of each API Gateway route. This walkthrough assumes you have a basic familiarity with workflow setup and configuration. If you need a refresher, tutorials are linked below.
Overview
Once a project has been configured to enable API Gateway support (outlined below), API Routes may be set up by adding workflows. A workflow can be included in or excluded from the API, and additional workflows can be set up to perform asynchronous tasks that are not available via the API directly. For example, a secondary workflow can be set up to perform data cleanup nightly; a supporting workflow can send out an email report every hour, etc.
Each distinct route on the API is created by setting up a workflow. When configured, an API route will be available to authorized third-party systems or tools such as Postman.
Request data sent to the API route will trigger the workflow, allowing that data to be processed using the workflow design. Requests are real-time, and due to technical limitations, a response must be given by the workflow within 30 seconds. In that way, best practices prioritize performance, as the walkthrough below makes a note of.
Once the workflow is complete, a response is generated using the configured output message resulting from the workflow. This is specifically a message called output, as other messages may be used within the workflow for processing the request message data.
Step 1: Before you start…
- Ensure that your tenant is licensed to access API Gateway functionality. Contact your Saltbox implementation consultant if you are unsure.
Step 2: Project Setup (Enabling the API)
A project is the base for a new API. To get started with API Gateway:
-
Create a project. Once configured, this project will be available as an API, which can be accessed by authorized third-party systems.
-
Enable API Gateway access for the project. This allows workflows to be configured and accessed as API routes.
-
Go to Project Settings > API Gateway.
-
Ensure the option
Enable AWS API Gateway access for the projectis checked. -
Save updated settings.
-
Once saved, API Keys can be managed, as outlined in the API Gateway Reference page.
For first time setup, generate a new API Key with the appropriate expiry date. Use the quick-copy link to copy the key. This may be used to authenticate connections to API Gateway using third-party tools such as Postman.
-
Step 3: API route workflow setup
To set up a new API Route:
-
Create a new workflow. For a walkthrough of this process, see Creating a new Workflow.
-
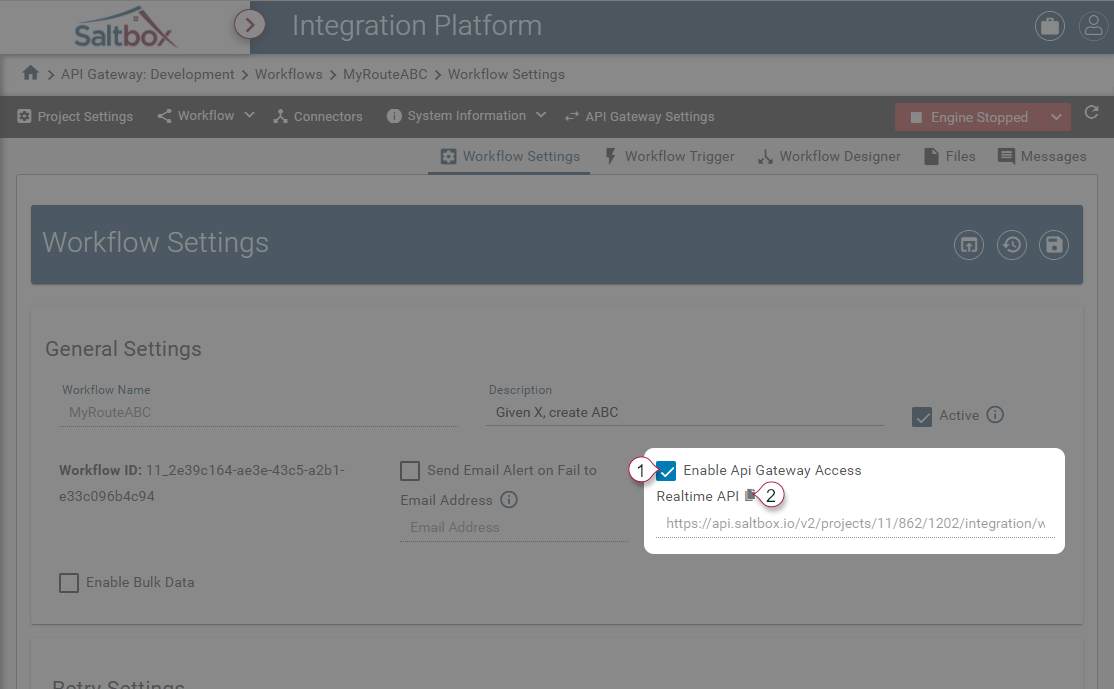
Once the workflow is created, go to Workflow Settings and ensure the option
Enable API Gateway Accessis checked (marker 1 below). Note that the Project must first be configured as outlined in step 2 above.Once the workflow’s API Gateway Access is enabled, the Realtime API route URL will be displayed. Use this URL in a third party app (such as Postman) to securely connect to the API. Copy the URL as needed using the quick-copy icon (marker 2 below).
-
Save settings to enable the route.
At this point, the API route can be accessed but will not yet perform any tasks.
At a high-level, next steps are as follows:
-
Configure the Workflow Trigger.
-
Create and refine the Workflow Design.
-
Create the response body using Visual Data Mapper. For general details about Visual Data Mapper, see Visual Data Mapper Overview.
3.1: Workflow Trigger setup
A Workflow Trigger defines the basic format of the request body data that’s expected by the workflow. For general details about Workflow Trigger setup, see Workflow Trigger Setup.
Configure API Gateway trigger settings as follows:
-
Connector:
Connector.Integration.Core -
Connection Config: (leave blank)
-
Source:
Event Workflow Trigger -
Source Settings
- ID Path: (leave blank - this will be configured in a future step)
-
Raw Message Contents
-
Message Format: Select the expected message format, such as
JSONorXML -
other settings may be left as default
-
Once settings are configured, Save the Workflow Trigger to apply settings. Restart the project engine if it was already started.
3.2: Workflow Design setup
Workflow Design follows the same basic process as other integrations.
-
Refer to Designing a Workflow for general walkthroughs of setting up a workflow.
-
Use the realtime workflow tester to revise a workflow’s design, see Realtime Workflow Testing
Best practices for designing an API Gateway workflow are provided, with notable highlights being:
-
Keep request and response data succinct. File sizes less than 100 KB are recommended to avoid delays in response time.
- Design the workflow to require as little data as is necessary to generate the desired response.
-
Design the workflow for speed. Workflows must return a response within 30 seconds or else the request will timeout.
- Where supported, perform targeted query-based data selection rather than time-costly object retrieval.
-
Test with various sample data sets (both success and failure) using a tool such as Postman.
-
Optimize the time-costliest actions first. A modest improvement on a long action provides better overall workflow optimization.
3.3: Response data format setup
Response data is generated using the output message.
To create the output message, use Visual Data Mapper. This may be generated using the Saltbox Core Connector’s “Transform Object” action, or any other action that generates an output message.
As with the workflow design, visual data map should be prioritized for time efficiency. Only map the fields necessary to achieve the response data (or data needed in an interim step).
-
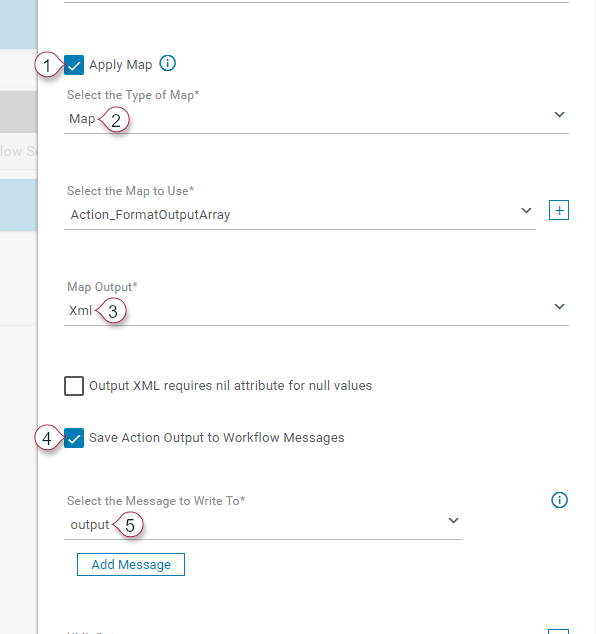
Enable
Apply Map(1). -
Set the
Map Typeto “Map” (2). -
Set the
Map Outputto the desired format (3). -
Enable
Save Action Output to Workflow Messagesto save the mapped results. -
Set the
Message to Write Toto “output”.
3.4: Supported data formats
API Gateway is able to support request and response data in JSON or XML data formats. (See marker 3 above).
Configure the Workflow Trigger to convert the request data supplied to the trigger into workflow-compatible message data.
Configure an output message named output to produce the API route’s response data. Ensure that the output type is set to the correct format (JSON or XML) that’s expected by the requesting application.
Step 4: Testing
The outline below uses Postman, although any API tool could be used.
-
In Saltbox, go to Workflow Settings and copy the Realtime API URL using the quick-copy button.

-
Create a new
POSTrequest using Postman. Paste the API URL in the Postman address bar.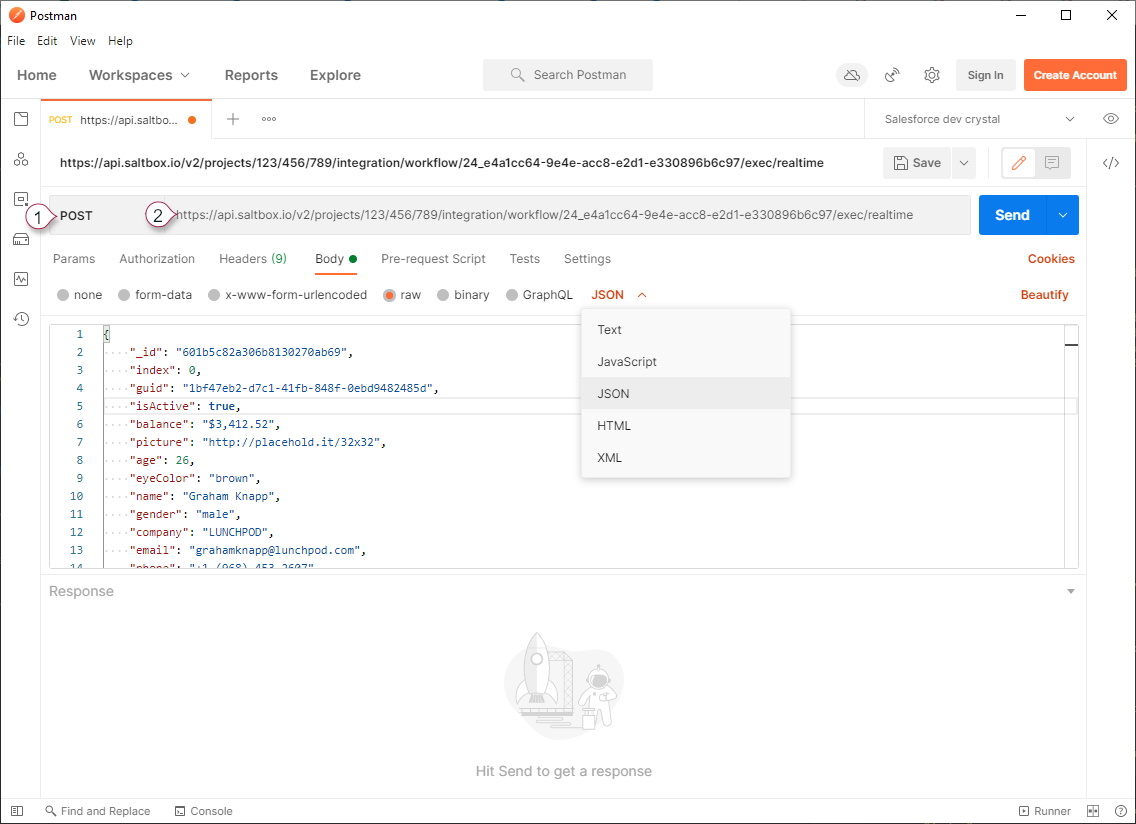
-
In Saltbox, go to Project Settings > API Gateway and copy the API Key using the quick-copy button.
-
Configure a Header parameter by opening the Postman Headers tab and adding the parameter name
X-Api-Key. Paste the API Key in Postman as theX-Api-Keyvalue.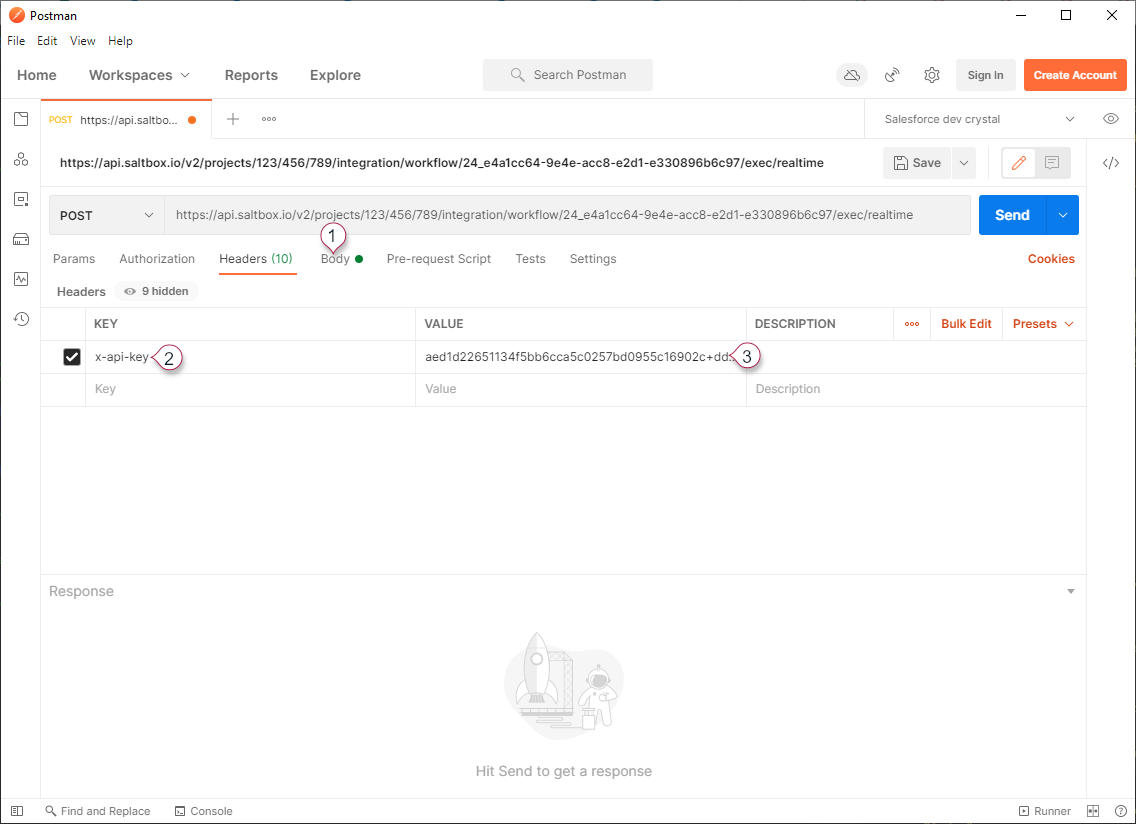
-
Configure request data by opening the Postman Body tab and selecting
rawas the format. Configure the specific format as required by the request data being submitted (in this case JSON). Provide the data that will be sent to the API for processing.
-
Send the request.
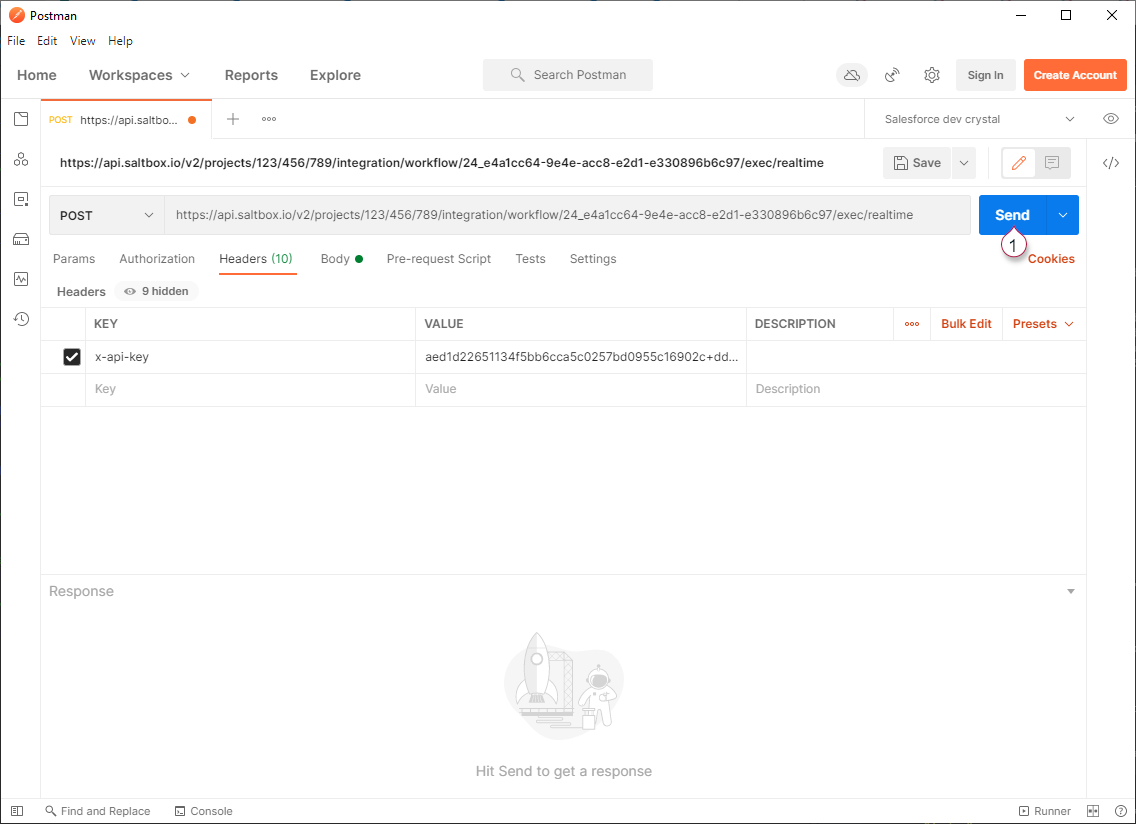
-
At this point a response will be displayed in Postman. If the workflow was successful, the API will respond with 200 status code and response data. If the workflow was not successful, an status code will be provided (see API Gateway Error Codes)
The message that was processed may be viewed using the Saltbox Message Trace feature.
Inspect request data by expanding the Status section (marker 1) and opening the data using
rawMessage.xmlfor raw request data (marker 2) andmessage.xmlfor pre-processed workflow-compatible data (marker 3).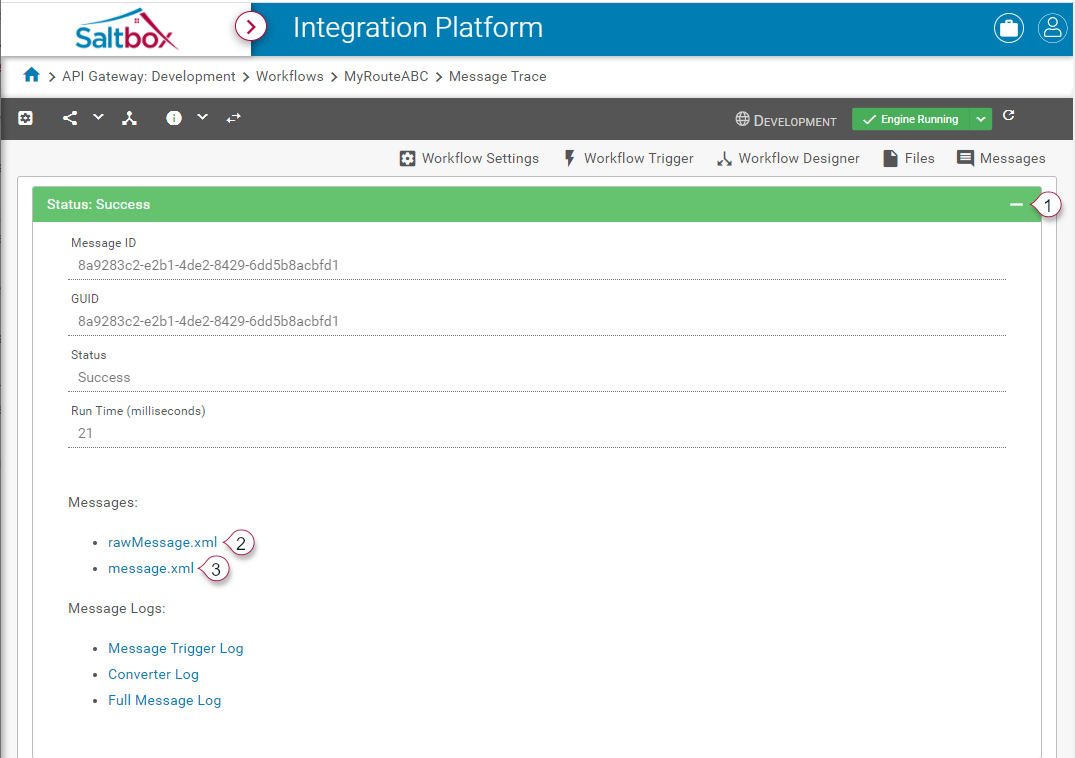
Inspect response data by expanding the last action to modify the “output” message (typically the last action in the workflow).
Note that Data Retention policies may apply, which impact how long (and even if) request/response data is available.