
Implementing Workflows for Sage Intacct

Sage Intacct integrations are supported by the Sage Intacct Connector.
Prerequisites
Step 1: Enable Saltbox access to Sage Intacct
Add the Saltbox sender ID to Sage Intacct’s allowed list as follows:
-
Log into Sage Intacct.
-
Go to:
Company > Admin tab > Subscriptions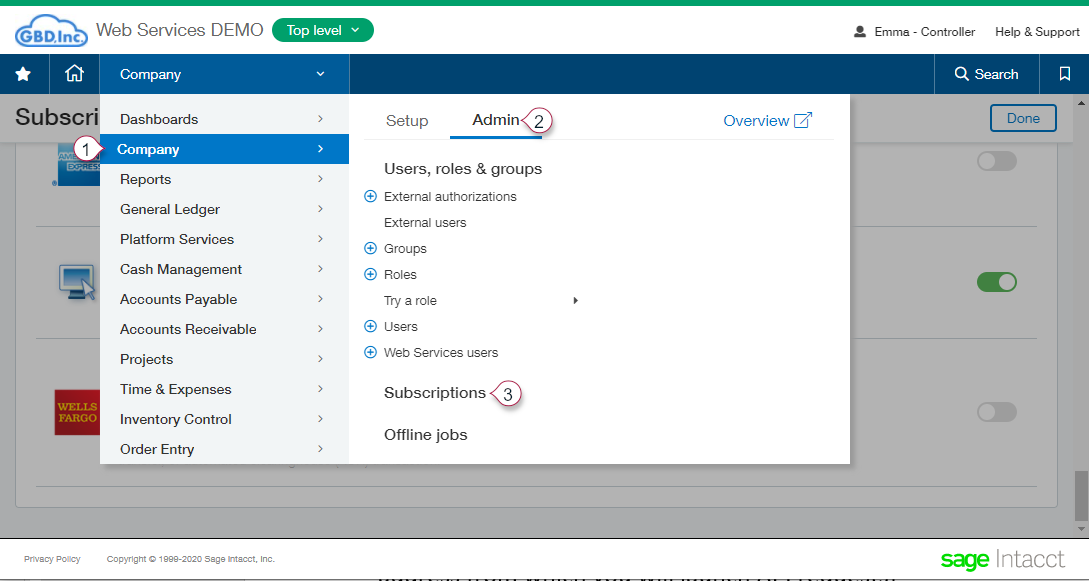
-
Enable
Web Servicesas shown below: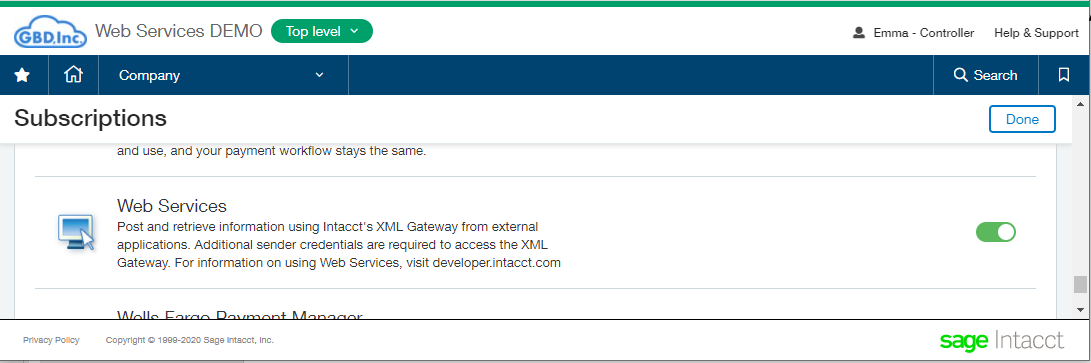
-
Ignore the warning about additional charges.
Step 2: Configure Saltbox Access Details in Sage Intacct
To add the Saltbox IP address to Sage Intacct’s allowed list:
-
Log into Sage Intacct.
-
Go to:
Company > Setup tab > Company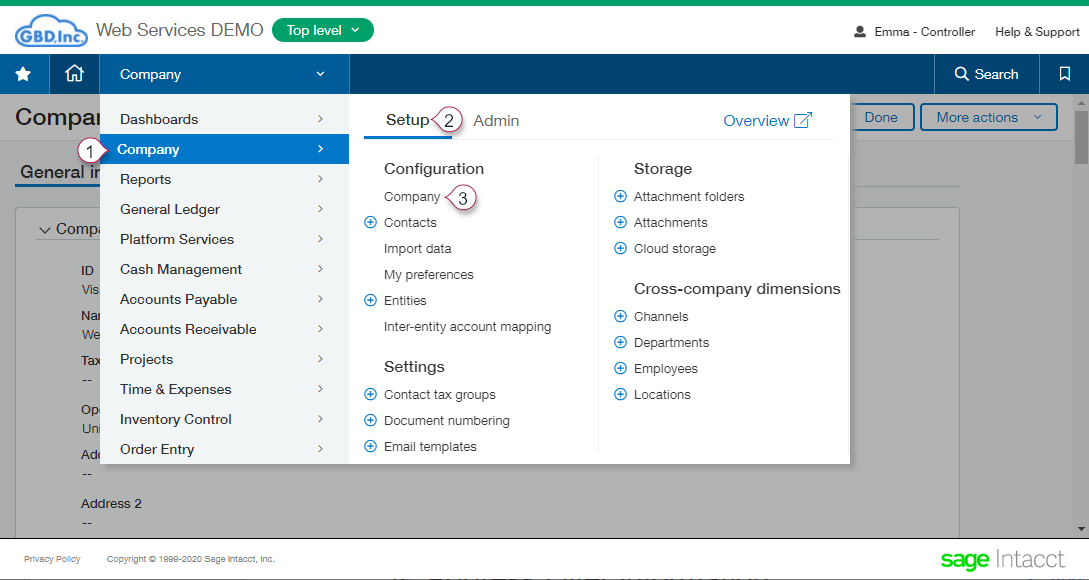
-
Press the Edit button.
-
Open the
Securitytab. -
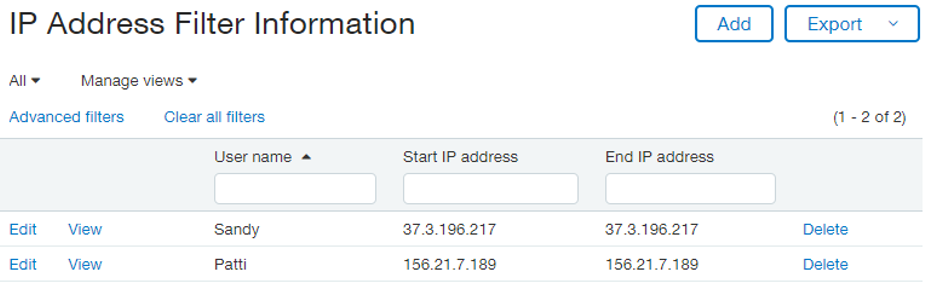
Go to the field labeled “Enforce IP address filters” and press the Edit icon.
-
Configure IP details for the user assigned in Saltbox Connector Configuration settings. Contact your implementation consultant for your Saltbox IP address.
-
Save to apply changes.
Step 3: Enable Saltbox as a safe sender
To add Saltbox’s Sender ID to the allowed list:
-
Log into Sage Intacct.
-
Go to:
Company > Setup tab > Company -
Press the Edit button.
-
Open the
Securitytab. -
Go to the section labeled “Web Services authorizations” and add
Vision33MPPto the authorizations list.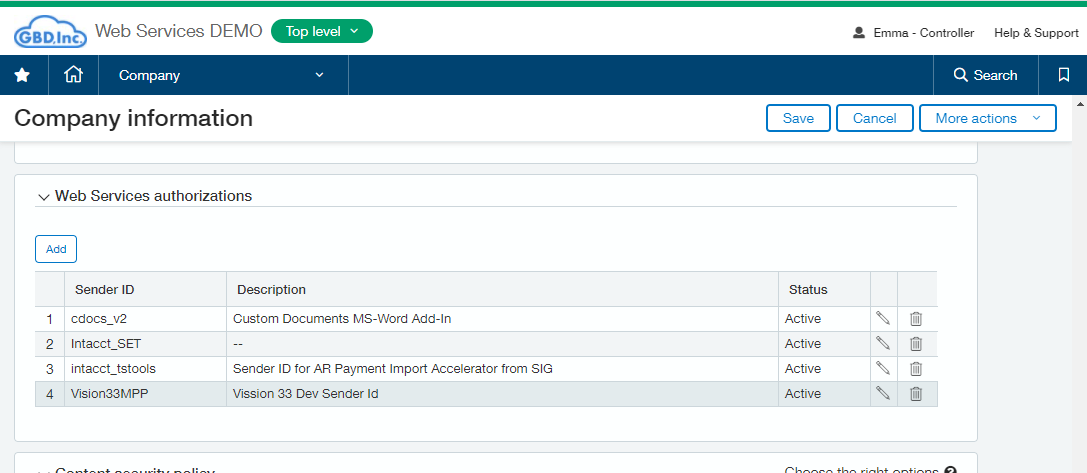
-
Save to apply changes.
Step 4: Configure Sage Intacct User
To support integrations, a Sage Intacct user must be configured with sufficient permissions to allow Saltbox to perform data updates and retrieval. This process is outlined below.
Note that these instructions vary slightly depending on how the company’s security is defined (either “Role-Based” or “User-Based”).
Creating a user with role-based security
First, create the Role which will be used by the user assigned to Saltbox.
-
Log into Sage Intacct.
-
Go to:
Company > Admin tab > Roles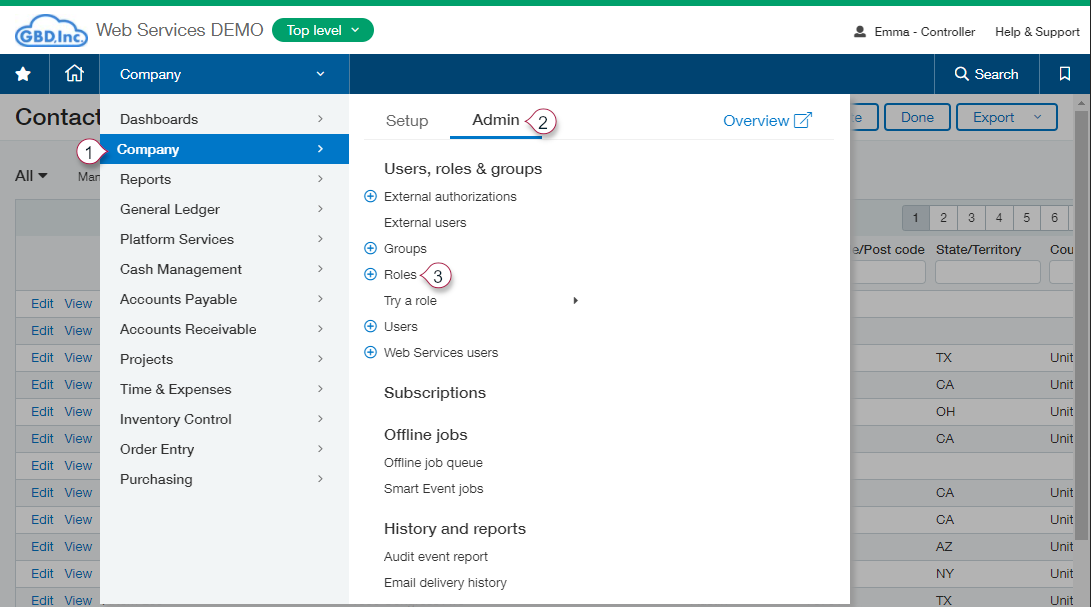
-
Press the “Add” button.
-
Configure the user’s Name and press “Save”.
-
Enable the necessary permissions for each module and press “Save”.
Next create the Web Service User which will be assigned to Saltbox:
-
Go to:
Company > Admin tab > Web Service User -
Press the “New” button.
- Configure values for:
- User ID
- Last name
- First name
- Email address
- Make sure the User Type is set to
Business User
-
Open the “Roles Information” tab and select the role created above.
-
Press “Save” to apply changes.
- Ignore any warning that there will be a charge for creating the User.
Creating a user with user-based security
First, create the Web Service User which will be assigned to Saltbox:
-
Go to:
Company > Admin tab > Web Service User -
Press the “New” button.
- Configure values for:
- User ID
- Last name
- First name
- Email address
- Make sure the User Type is set to
Business User
-
Open the “Roles Information” tab and select the role created above.
-
Press “Save” to apply changes.
- Ignore any warning that there will be a charge for creating the User.
Next, configure user permissions for this user:
-
After saving the user, Sage Intacct will return to the list of Web Service Users.
-
Find the newly created Web Service User and press the user’s “Subscriptions” button.

-
Enable the necessary permissions for each applicable module.
-
Press “Save” to apply changes.
Sage Intacct Connector
Metadata for Sage Intacct integrations may be installed using the Sage Intacct web login, or via the Sage Intacct API using a third-party client such as Postman. A detailed walkthrough is outlined below.
Golden Workflows
Golden Workflows are provided out-of-the-box and support specific business scenarios. Examples include:
- Integrating a web store with an ERP System (Shopify, Magento, WooCommerce, etc.)
- Integrating warehouse management with an ERP System (Amazon, ShipStation, Pharos, etc.)
- Integrating support systems together or with an ERP System (Zendesk, HubSpot, etc.)
- much more!
This implementation guide outlines the details necessary for installing and configuring golden workflows (outlined below) Sage Intacct. For other implementation guides, see Golden Workflow Install Guide.
For general Golden Workflow documentation, see Connector Golden Workflows.
This ERP System integrates with a number of Cloud Connectors. In addition to standard Sage Intacct Connector metadata, connector-focused fields may be required to support a given Cloud Connector. Refer to each Connector’s installation instructions to confirm details.
HubSpot Golden Workflows
HubSpot Golden Workflows integrate your HubSpot environment with an ERP system (such as Sage Intacct):
- SAP Business One Item to HubSpot Product
- SAP Business One Quote to HubSpot Deal
- SAP Business One Order to HubSpot Deal
- HubSpot Quote to SAP Business One Quote
- SAP Business One Business Partner to HubSpot Company and Contact
- HubSpot Company to SAP Business One Business Partner
- HubSpot Contact to SAP Business One Business Partner Contact
For other HubSpot connector documentation, such as action details and release notes, see: HubSpot Connector Reference.
Saltbox Metadata
Technical information is provided in this section. Installation instructions are found at the bottom of this page in the Metadata Installation section.
HubSpot Connector Metadata
The following metadata is required to support HubSpot integrations with Sage Intacct, including Golden Workflows.
Technical information is provided in this section. Installation instructions are found at the bottom of this page in the Metadata Installation section.
| Field Name | Description | Installation Details |
|---|---|---|
V33SB_EXTERNALBPID |
Customer ID for external system (i.e. HubSpot) This field is shared across Connectors. |
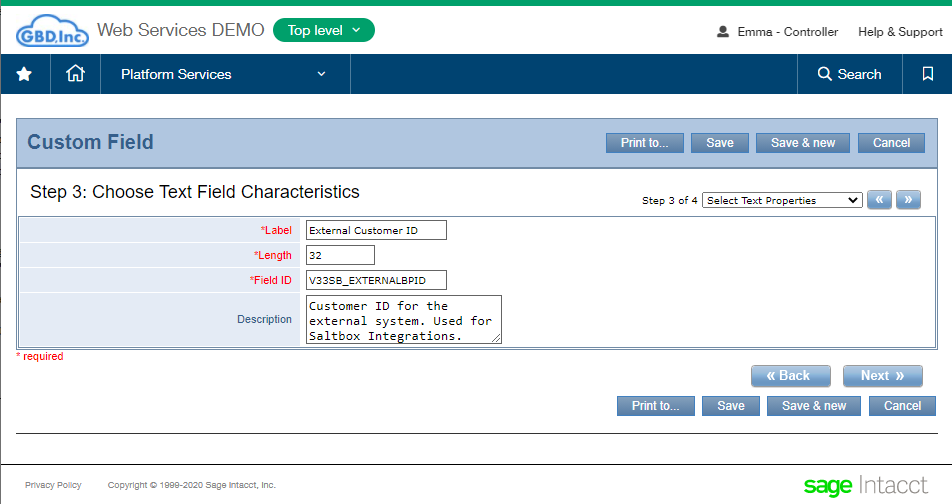
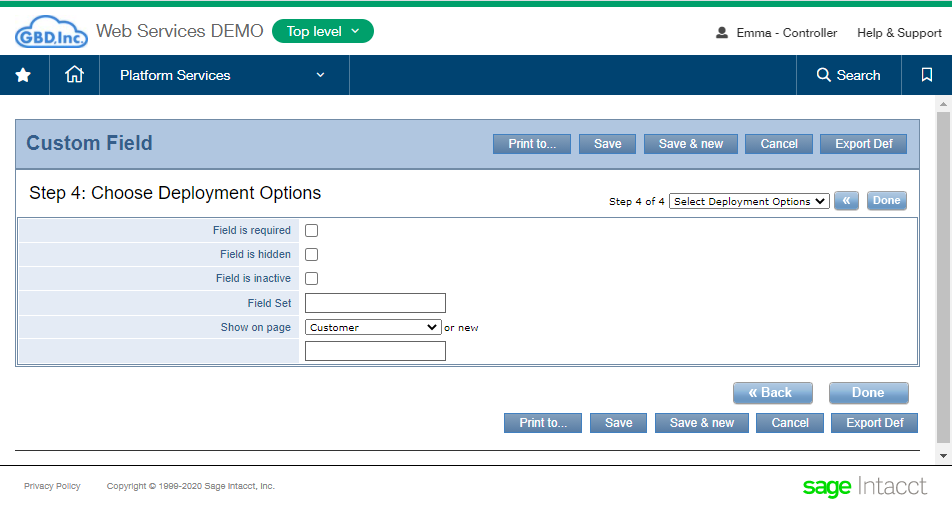
Object: Customer Field Data Type: Text Field Characteristics: Label: External Customer ID Length: 32 Field ID: V33SB_EXTERNALBPID Description: Customer ID for the external system. Used for Saltbox Integrations. Deployment Details: Show on page: Header, other fields blank. |
V33SB_EXTERNALORDERID |
Order ID for external system (i.e. HubSpot). This field is shared across Connectors. |
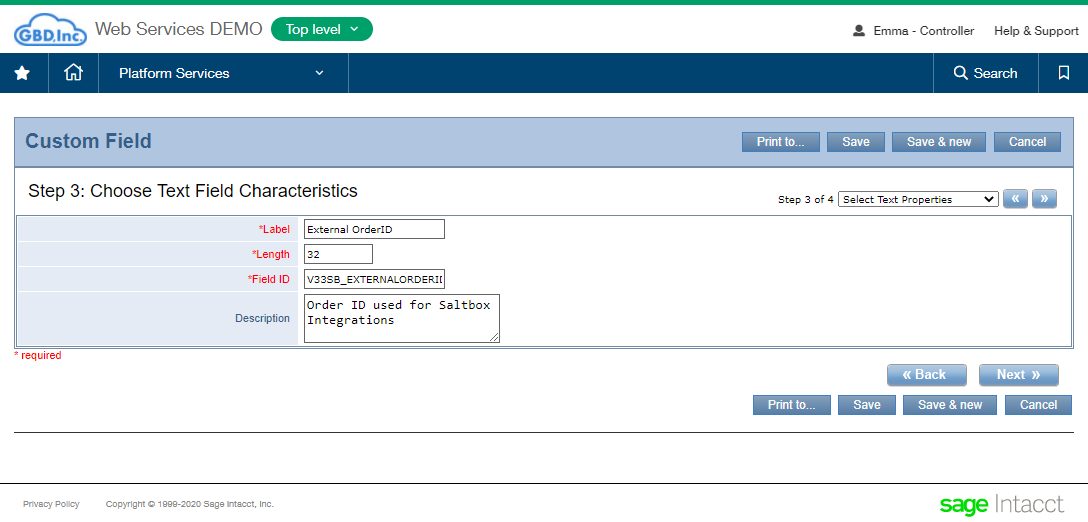
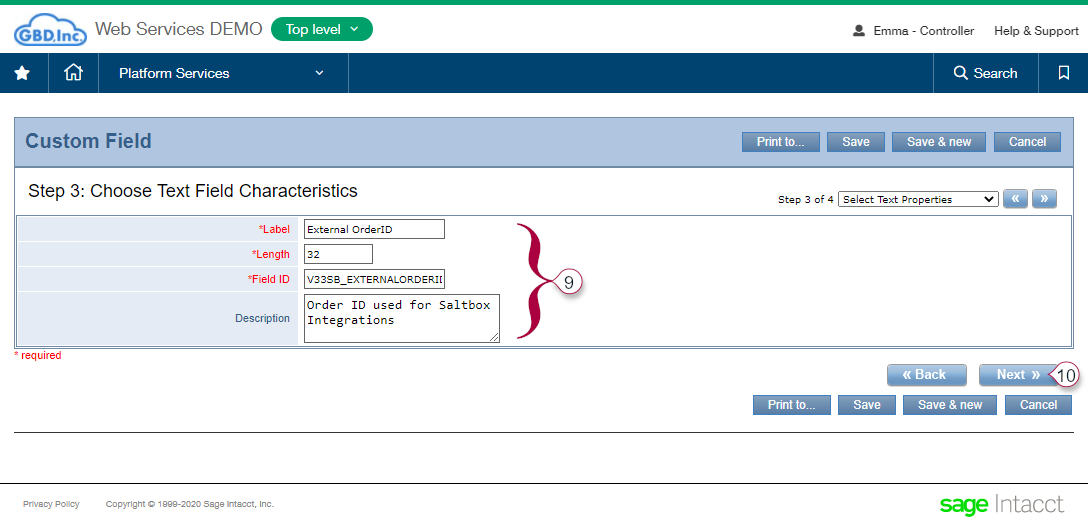
Object: Order Entry Transaction Document Type: Sales Order Field Data Type: Text Field Characteristics: Label: External Order ID Length: 32 Field ID: V33SB_EXTERNALORDERID Description: Order ID used for Saltbox Integrations Deployment Details: Show on page: Header, other fields blank. |
V33SB_EXTERNALORDERSRC |
Source of the order (e.g. HubSpot). This field is shared across Connectors. If multiple Connectors are used, include all options in the Field Characteristics screen where noted. This field may be edited later if new options are added. |
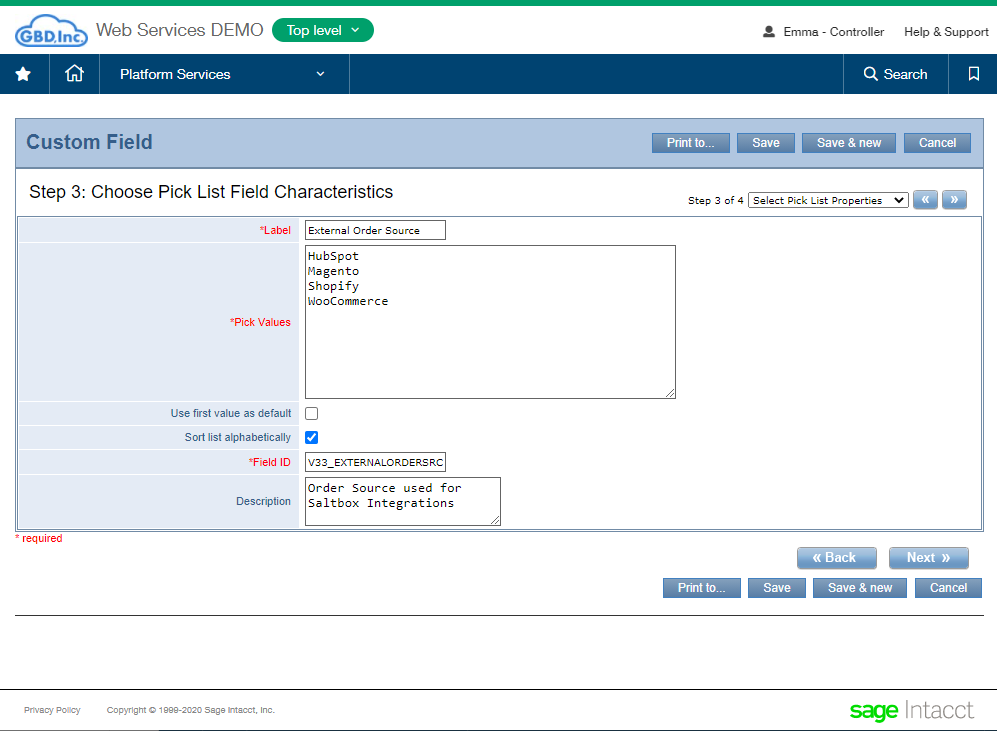
Object: Order Entry Transaction Document Type: Sales Order Field Data Type: Picklist Field Characteristics: Label: External Order Source Pick Values: HubSpot (plus any other supported web stores) Use first value as default: false (unchecked) Sort list alphabetically: true (checked) Field ID: V33SB_EXTERNALORDERSRC Description: Order Source used for Saltbox Integrations Deployment Details: All fields blank. |
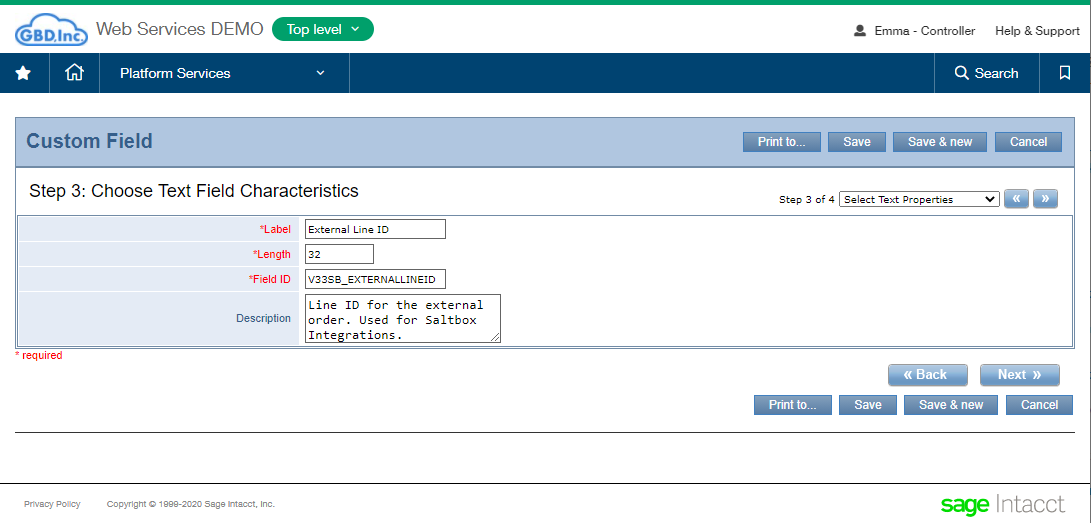
V33SB_EXTERNALLINEID |
Line ID for external system (i.e. HubSpot) This field is shared across Connectors. |
Object: Order Entry Transaction Detail Document Type: Sales Order Field Data Type: Text Field Characteristics: Label: External Line ID Length: 32 Field ID: V33SB_EXTERNALLINEID Description: Line ID for the external order. Used for Saltbox Integrations. Deployment Details: All fields blank. |
Manual Installation Walkthroughs
External Customer ID Walkthrough
External Order ID Walkthrough

External Order Source Walkthrough

External Line ID Walkthrough

Shopify Connector Metadata
The following metadata is required to support Shopify integrations with Sage Intacct, including Golden Workflows.
Technical information is provided in this section. Installation instructions are found at the bottom of this page in the Metadata Installation section.
| Field Name | Description | Installation Details |
|---|---|---|
V33SB_EXTERNALORDERID |
Order ID for external system (i.e. Shopify). This field is shared across Connectors. |
Object: Order Entry Transaction Document Type: Sales Order Field Data Type: Text Field Characteristics: Label: External Order ID Length: 32 Field ID: V33SB_EXTERNALORDERID Description: Order ID used for Saltbox Integrations Deployment Details: Show on page: Header, other fields blank. |
V33SB_EXTERNALORDERSRC |
Source of the order (e.g. Shopify). This field is shared across Connectors. If multiple Connectors are used, include all options in the Field Characteristics screen where noted. This field may be edited later if new options are added. |
Object: Order Entry Transaction Document Type: Sales Order Field Data Type: Picklist Field Characteristics: Label: External Order Source Pick Values: Shopify (plus any other supported web stores) Use first value as default: false (unchecked) Sort list alphabetically: true (checked) Field ID: V33SB_EXTERNALORDERSRC Description: Order Source used for Saltbox Integrations Deployment Details: All fields blank. |
V33SB_EXTERNALLINEID |
Line ID for external system (i.e. Shopify) This field is shared across Connectors. |
Object: Order Entry Transaction Detail Document Type: Sales Order Field Data Type: Text Field Characteristics: Label: External Line ID Length: 32 Field ID: V33SB_EXTERNALLINEID Description: Line ID for the external order. Used for Saltbox Integrations. Deployment Details: All fields blank. |
V33SB_SHOPIFYITEMID |
Shopify Item ID. | Object: Item Field Data Type: Text Field Characteristics: Label: Shopify Item ID Length: 32 Field ID: V33SB_SHOPIFYITEMID Description: Shopify Item ID used for Saltbox Integrations Deployment Details: Show on page: General Info, other fields blank. |
V33SB_SHOPIFYITEMINVTID |
Shopify Inventory ID. | Object: Item Field Data Type: Text Field Characteristics: Label: Shopify Inventory ID Length: 32 Field ID: V33SB_SHOPIFYITEMINVTID Description: Shopify Item Inventory ID used for Saltbox Integrations Deployment Details: Show on page: General Info, other fields blank. |
V33SB_SHOPIFYVARIANTID |
Shopify Variant ID. | Object: Item Field Data Type: Text Field Characteristics: Length: 32 Field ID: V33SB_SHOPIFYVARIANTID Description: Shopify Variant ID used for Saltbox Integrations Deployment Details: Show on page: General Info, other fields blank. |
V33SB_SHOPIFYLASTCT |
Last Count | Object: (to be defined) Field Data Type: Number Field Characteristics: Label: Shopify Last Count Length: 12 Decimal Places: 0 Field ID: V33SB_SHOPIFYLASTCT Description: The last amount counted in Shopify inventory location. This field is used in Saltbox Integrations. Deployment Details: (to be defined) |
V33SB_SHOPIFYLOCATIONID |
Shopify Location ID for this Intacct Warehouse. | Object: warehouse Field Data Type: Text Field Characteristics: Label: Shopify Location ID Length: 32 Field ID: V33SB_SHOPIFYLOCATIONID Description: Shopify Location ID used to match this warehouse to a Shopify Location in Saltbox Integrations. Deployment Details: Show on page: Warehouse, other fields blank. |
Manual Installation Walkthroughs
External Order ID Walkthrough
External Order Source Walkthrough
External Line ID Walkthrough
Shopify Item ID

Metadata Installation
Metadata Installation involves installing custom fields needed to support a Sage Intacct integration. There are two ways to install metadata:
Option 1: Batch Metadata Installation
Metadata may be installed using a customization package, which includes necessary fields to support Saltbox integrations with different Connectors. Each Connector has its own package, so follow this process for each Connector.
-
Download the metadata file to your desktop.
-
This may be included in the golden workflow’s “setup” folder. On Saltbox, open the workflow’s files page and download the file from here.
-
Otherwise contact your implementation consultant for a copy of this file.
-
-
Log into Sage Intacct.
-
Go to
Customization Services/Platform Services > Customization Packages > Add. -
Select the downloaded metadata file.
-
Press “Import” to install the metadata.
-
Repeat this process once for each Connector.
At this point, the necessary metadata is installed and golden workflows may be run in Saltbox Integrations.
Option 2: Installation via Sage Intact Website
The walkthrough below outlines installing Saltbox metadata using Sage Intacct. Sage Intacct provides further documentation on their help site: https://www.intacct.com/ia/docs/en_US/help_action/Intacct_basics/welcome.htm
Sage Intacct provides a customization wizard to make setup as easy as possible. Refer to the Connector Metadata sections above for details about which metadata is needed for each connector.
To install a Custom Field:
-
Log into Sage Intacct
- Depending on which subscription you have, one of the following paths will open the wizard:
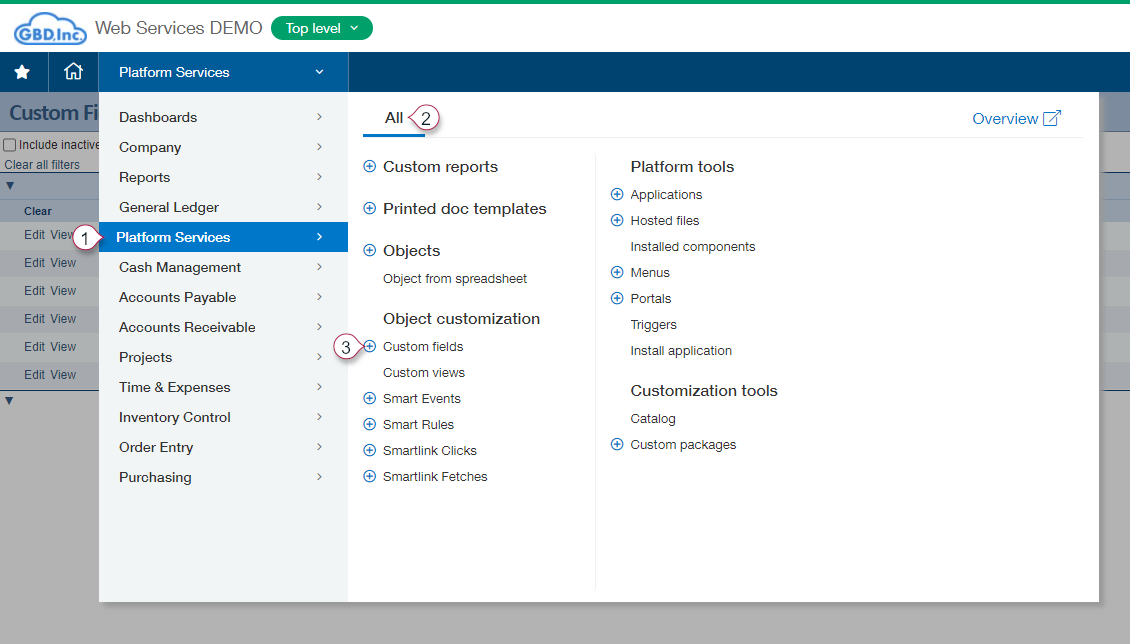
- Go to
Platform Services > All tab > Object Customization. Press the “+” button next toCustom Fields. - Go to
Customization Services > All tab > Object Customization. Press the “+” button next toCustom Fields.
- Go to
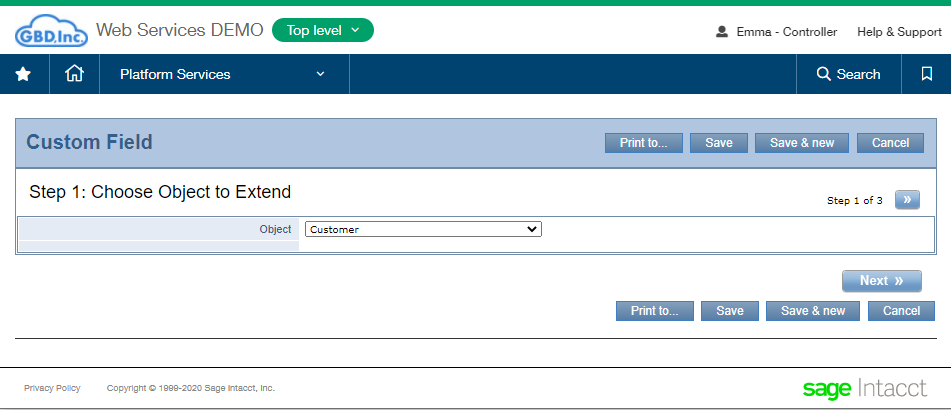
-
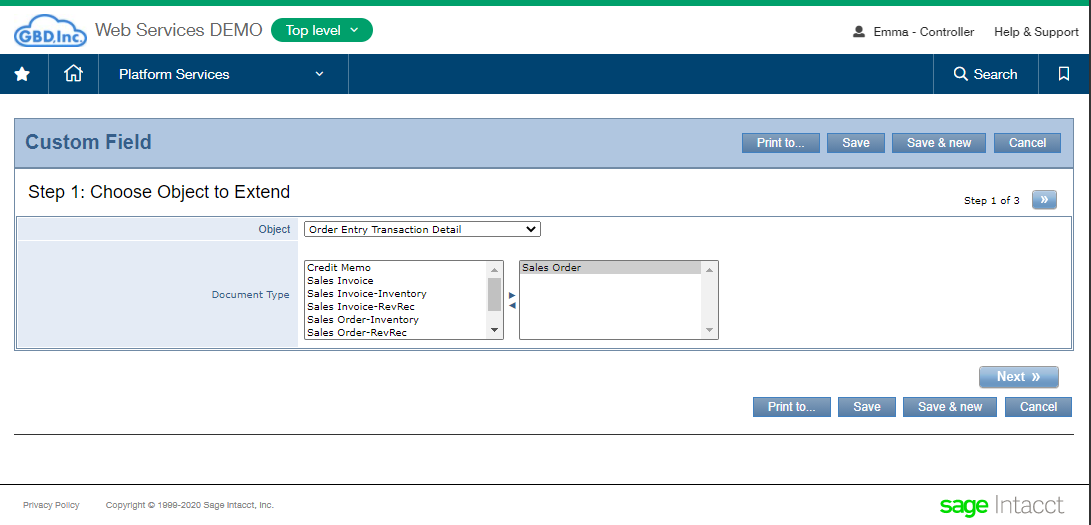
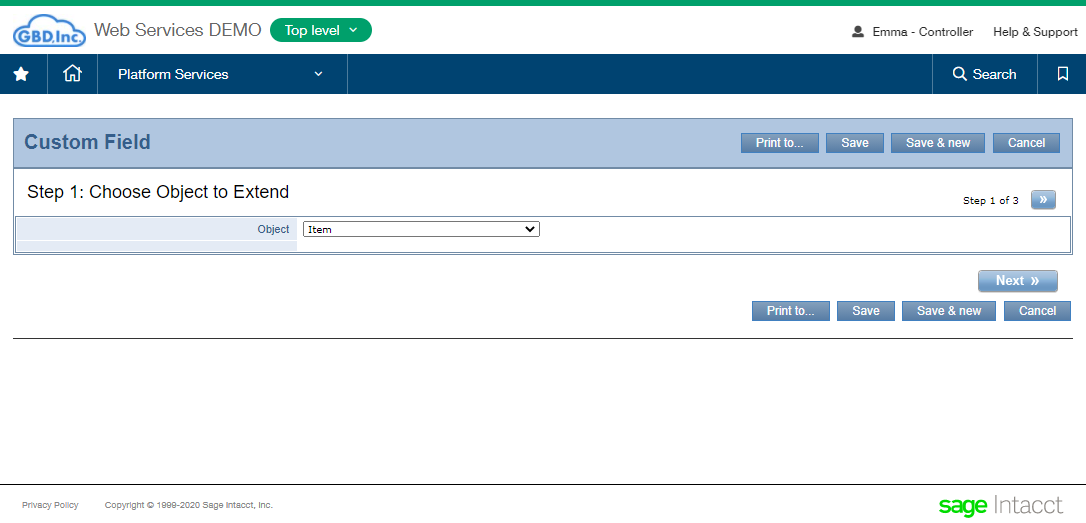
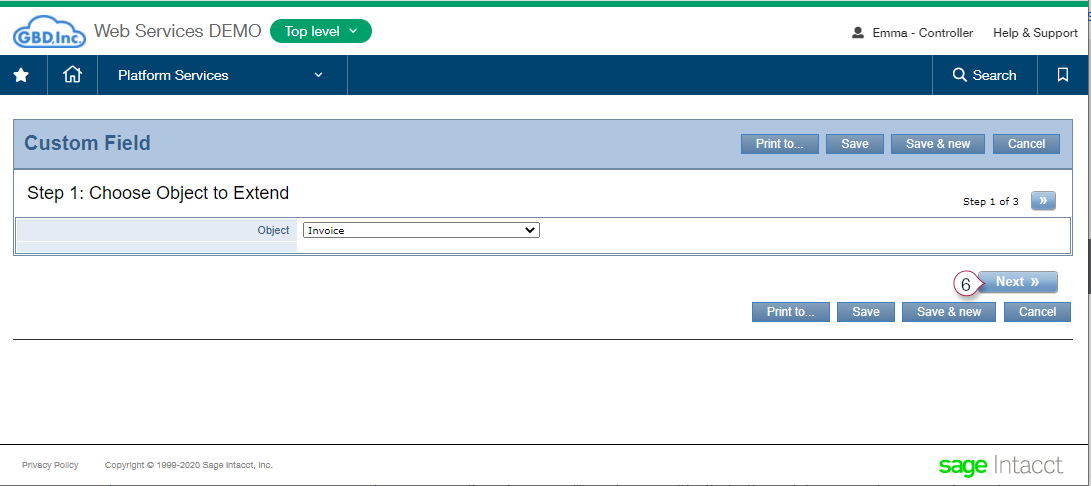
Select the
Objectfrom the drop-down, as defined above for each Connector.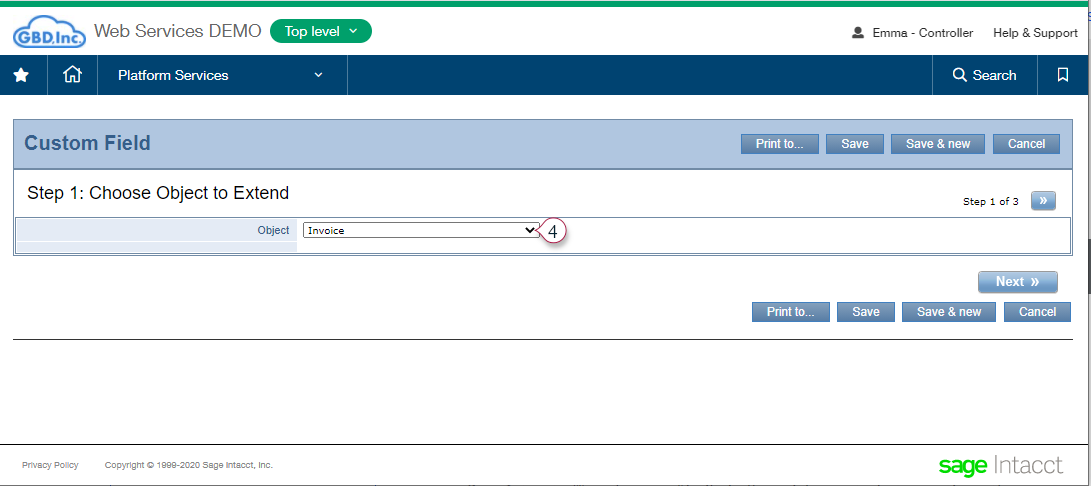
-
If supplied by the wizard, select the
Document Typeoptions defined above for each Connector.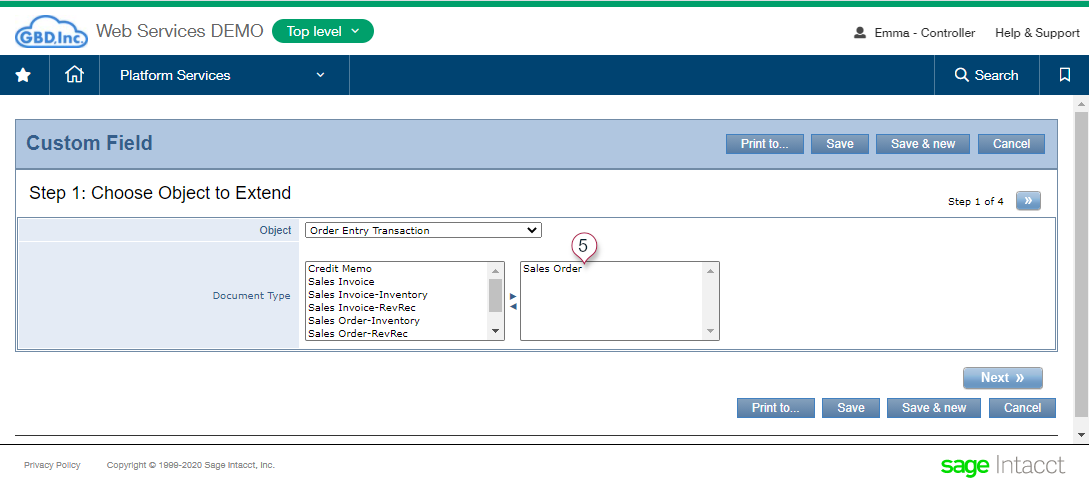
-
Press “Next” to proceed.
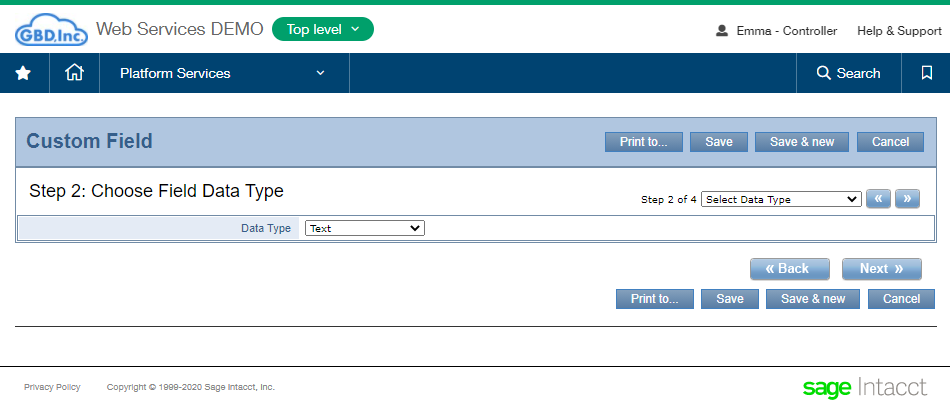
-
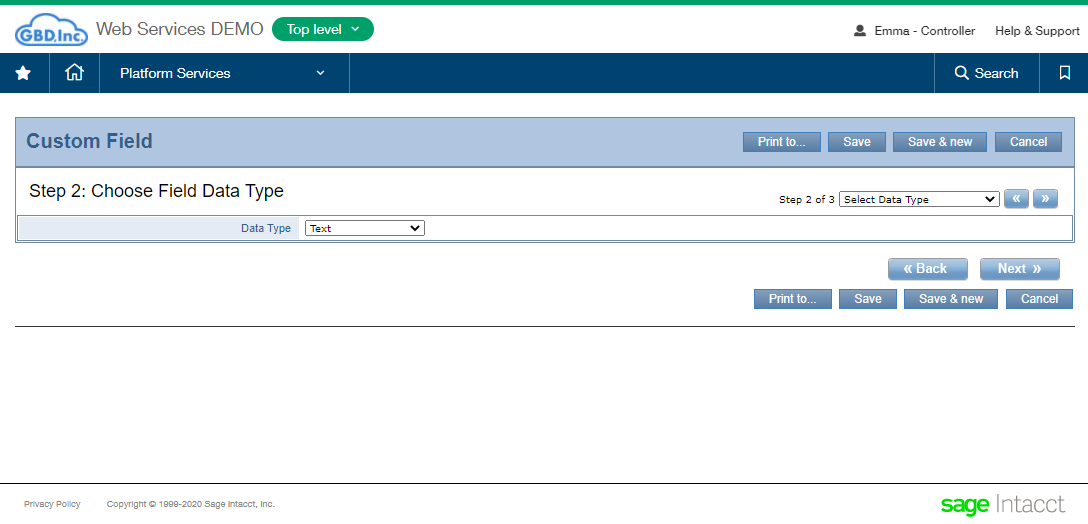
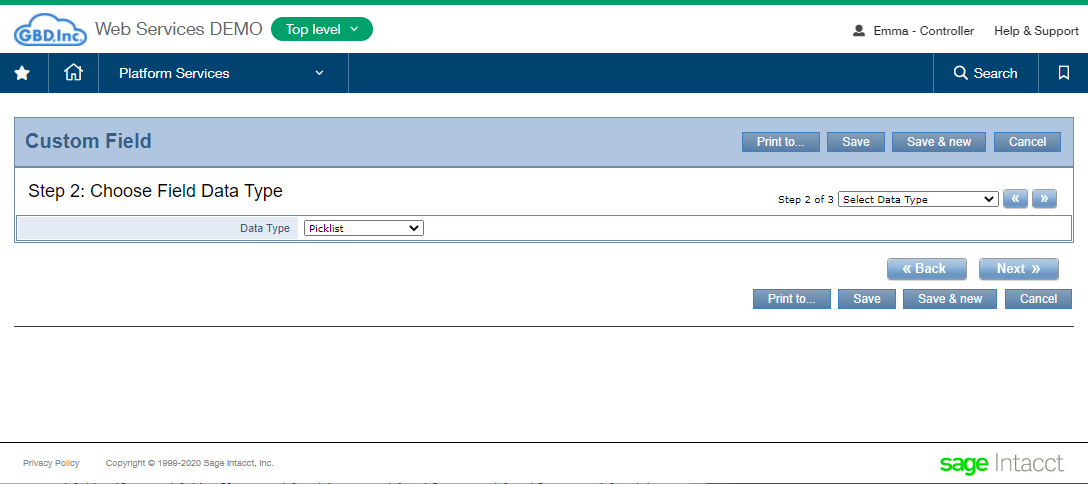
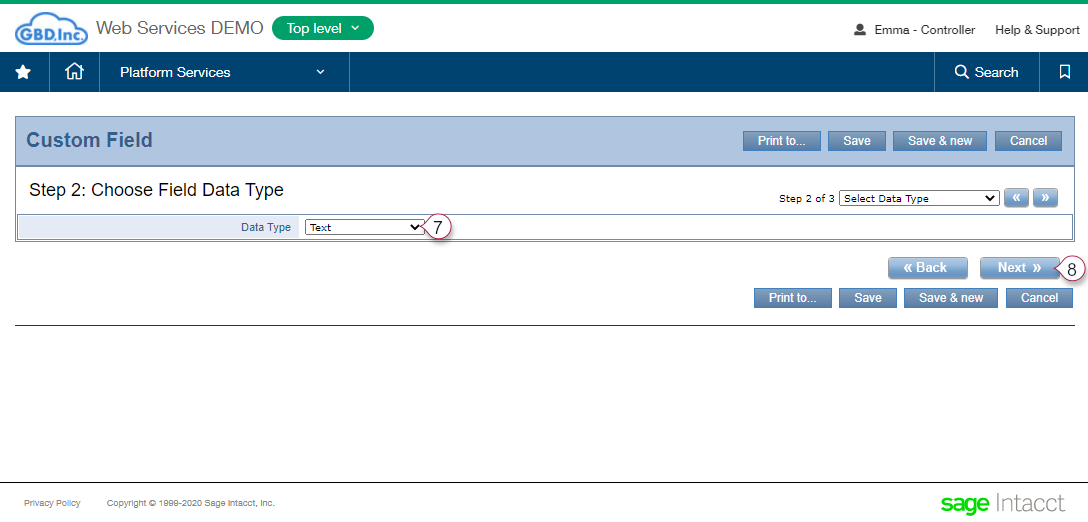
Choose a field type as defined above for each Connector. Press Next to proceed.
-
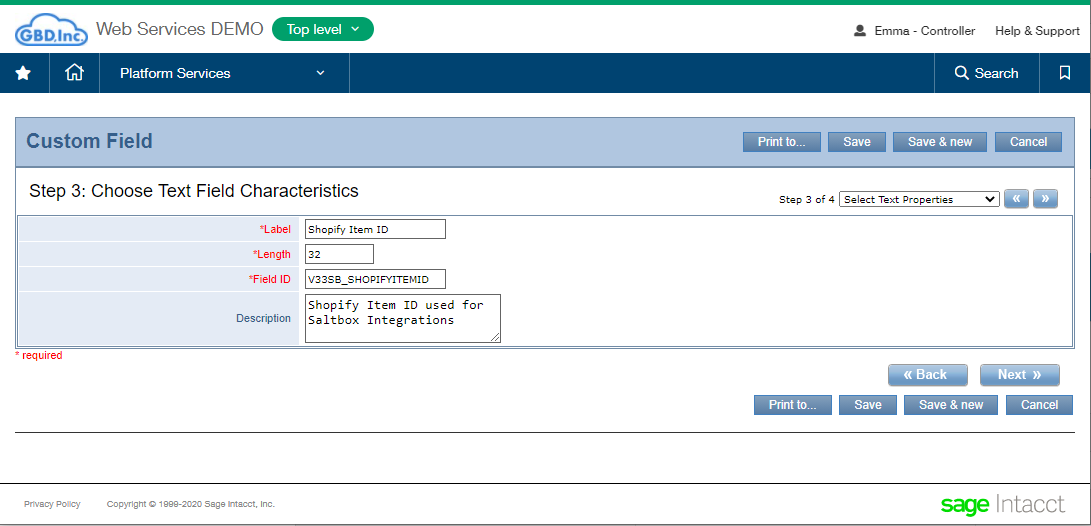
Set the field characteristics as defined above for each Connector. Press “Next” to proceed.
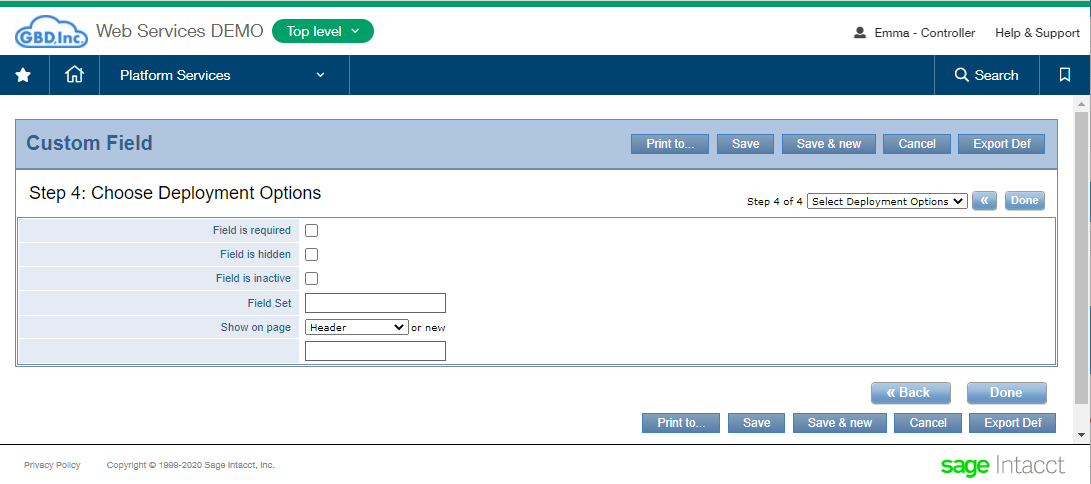
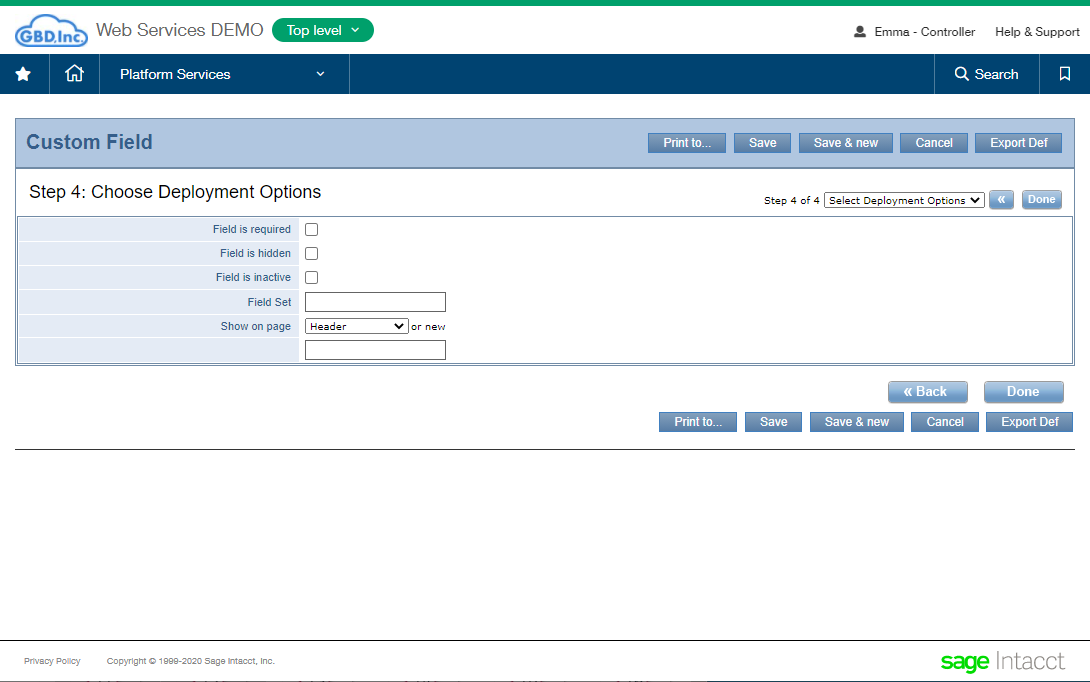
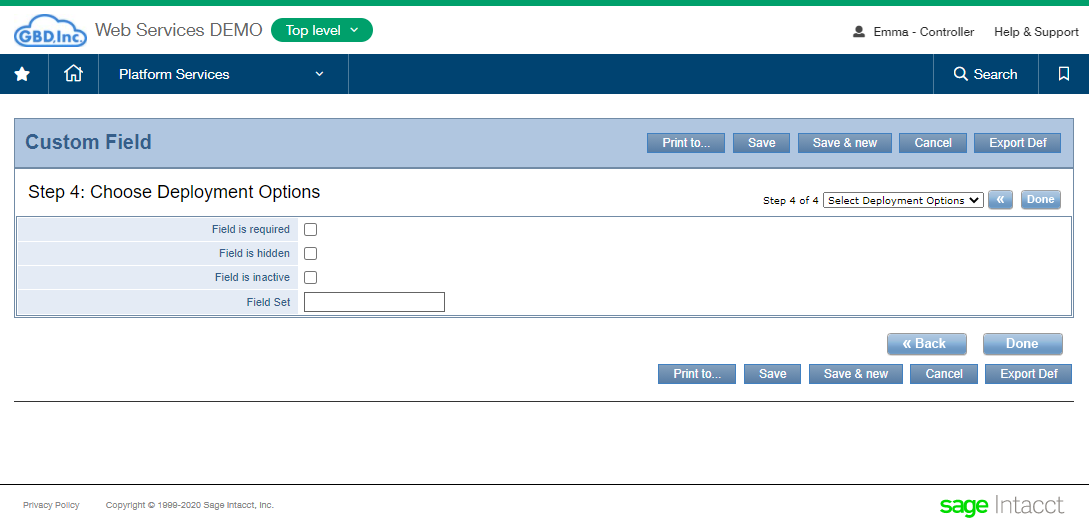
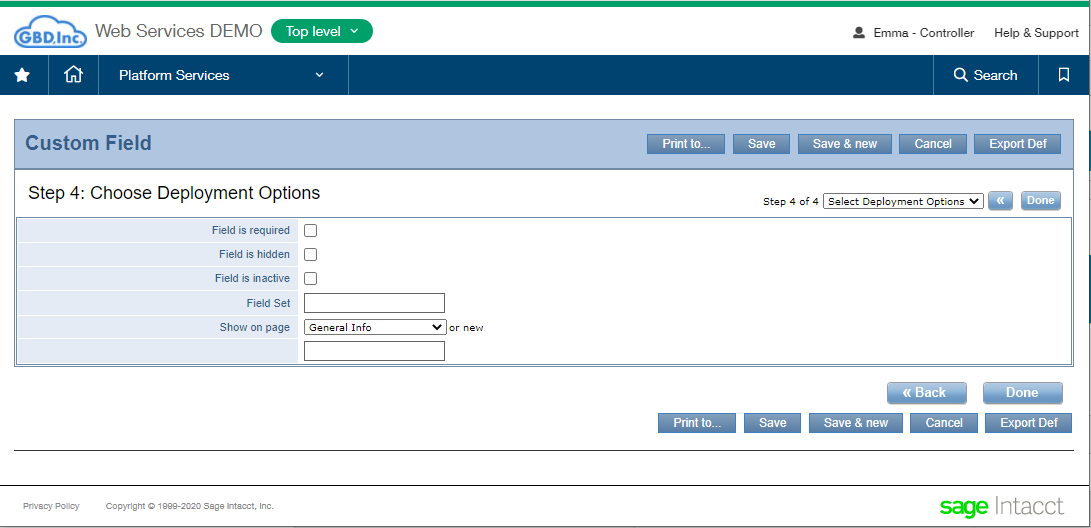
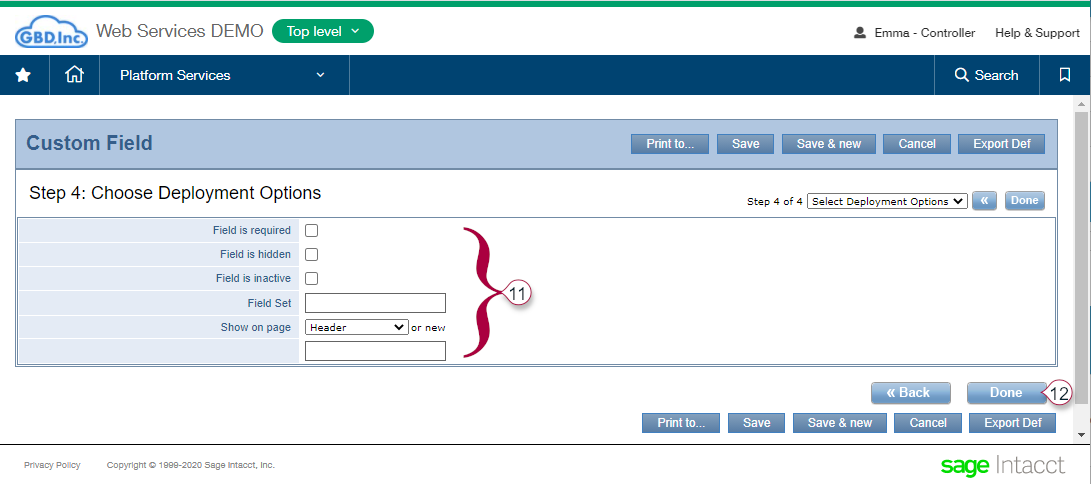
-
Set the deployment options as defined above for each Connector. Press “Done” to complete the field installation.
Once installation of all fields is complete for the necessary Connectors, golden workflows may be run in Saltbox Integrations.